Workshop
Wheelin’
Last night I had time to sit at my computer and work with Rhinoceros and RhinoCAM. Weird names but Rhino is a 3-D CAD program and the other converts drawings to CNC code.
Many months ago I designed a perfect drawing of the A3 locomotive driver and is one of the “driving” reasons for me to set the Micro CNC mill into operation. I ran my first output code on a wood block last Sunday and it was a disaster! The mill ran fine but the cutting was awful.
I ran the compiler again last night and produced another machine code file. (After a little more reading and understanding of what I am doing.) There is so much to learn in this CNC stuff!
I ran the new code on the micro-mill last night for about three passes on the trial block and it now runs exactly as intended. I did not have time to run the whole file as it is several hours long. If all continues to go well, I could have a “proof” to show off after the weekend. – Dan’l
CNC Mill Backboard Installed
I got the backboard installed today. The afternoon was bright and sunny and the temp was cool. Somewhere in the 80’s. Just right for working in the shop.

The white material is available a Lowe’s. It seems to me mostly a plastic but somewhat like Linoleum. I was able to cut it with large sheet metal shears. It is attached with liquid nails. The corners are caulked. The material has a pebbly but shiny surface.
In the store Lowe’s built a booth using this material. It is where they wet cut ceramic floor tiles. It is holding up very well to the wet saw use. So it should be great for this application.
I expect the chip pan to show up next week. – Dan’l
CNC Running Again
I spent most of the late morning and early afternoon today getting the bits and pieces working again for the Taig Micro-Mill CNC setup. The configuration layout has changed since I built a new bench in a new location in the workshop. I also fiddled quite a bit with the electrical and software set-up. It is at a point where it can again do some CNC work.
The Taig Micro-Mill is still fine shape after it’s leap to the floor in the “Great Wreck (GW)”. I have the new ER 16 spindle on it now. This is a micro-mill and I intend to use it that way under CNC control.

Here is the mill in place. The X-axis stepper will fit under the shelf to the right. However, the mill will be setting farther to the left in a chip pan. Also the rear wall will be covered with something more durable than painted drywall!
The power supply/controller I built is working just fine after its participation in the “GW”. I did a “dry run” using a two hour 3-axis milling program today. It was a “burn in” test to make sure all the components could take the heat and stress. It will work harder when pushing a cutter, but I feel there is enough reserve to do just about any project that will fit on the mill. The original computer died in the “GW” so I am using the computer I used to run in the home office. It is a 2.56 MHZ P4 with a GIG of RAM. It is running Windows XP Pro and SUSE Linux 10.1. Only Windows is used for the CNC. However, I am writing this while over in the Linux OS.

Today I updated the MACH3 to the newest version. Then I started… Continue reading
Benched Myself
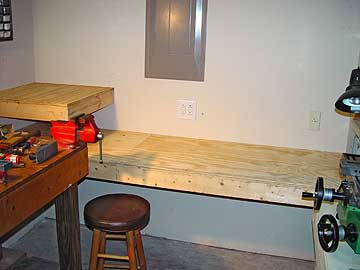
This is the project I have been working on all day. On Labor Day I was laboring my… um… you know, off! I also pulled in the power outlets below the circuit box and the one to the far right. The duplex outlets are fed with 220 volts split to each side with GFI outlets for each phase. This is in the garage so GFI is code. The outlet to the far right is 220 volts with a special plug. Its for my new saw, but I also have a special plan for Christmas lights this year. More on that at some other time.
The bench is two level as the CNC computer and screen will be on the upper bench. THE CNC power supply will be under the upper bench (shelf). The lower level is desk height so I will be able to sit in a chair at this location. The CNC mill will be on this lower bench.
This bench is very stout as it is mounted to the wall. There are only two legs and both are hidden in this photo. One is in the front corner far right. The left leg starts down at the near corner of the upper bench and also supports the lower bench. That leg is hidden by the red bench vice.
I’ll show More in “The Hobbyist’s Machine Shop” when I get it painted and finished. I just didn’t want anyone thinking I was goofing off on a Holiday!
Dan’l